
Introduction
If you’re looking for a how to install a toilet seat step by step guide, you’re in the right place. Replacing or installing a toilet seat is one of the simplest home improvement tasks, yet many people feel unsure about doing it themselves.
The good news is that you don’t need any plumbing experience or special tools to get it done. With a clear step-by-step process, you can easily remove the old seat and install a new one in just a few minutes.
In this guide, we’ll walk you through everything you need to know to complete the installation quickly, correctly, and without any confusion.
Table of Contents
Tools and Materials You’ll Need
Before you begin this how to install a toilet seat step by step guide, it’s important to gather a few basic tools and materials. The good news? You likely already have most of these at home, and anything missing is inexpensive and easy to find.
Essential Tools
- Adjustable wrench – Used to tighten or loosen the nuts underneath the toilet bowl
- Screwdriver (flathead or Phillips) – Helps secure the bolts from the top side
- Pliers (optional) – Useful if old bolts are rusted or hard to remove
Required Materials
- New toilet seat – Make sure it matches your toilet shape (round or elongated)
- Mounting bolts and nuts – Usually included with the new toilet seat
- Plastic or rubber washers – Help keep the seat stable and prevent loosening
Cleaning Supplies (Recommended)
- Disinfectant cleaner – To clean the toilet surface before installation
- Cleaning cloth or paper towels – For wiping away dirt and bacteria
Having everything ready before you start will make the process smoother and faster. In this how to install a toilet seat step by step guide, proper preparation ensures you won’t have to stop midway to look for missing tools.
Types of Toilet Seats
Before you follow this how to install a toilet seat step by step guide, it’s important to choose the right type of seat. Not all toilet seats are the same, and picking the correct one will make installation easier and ensure a perfect fit.
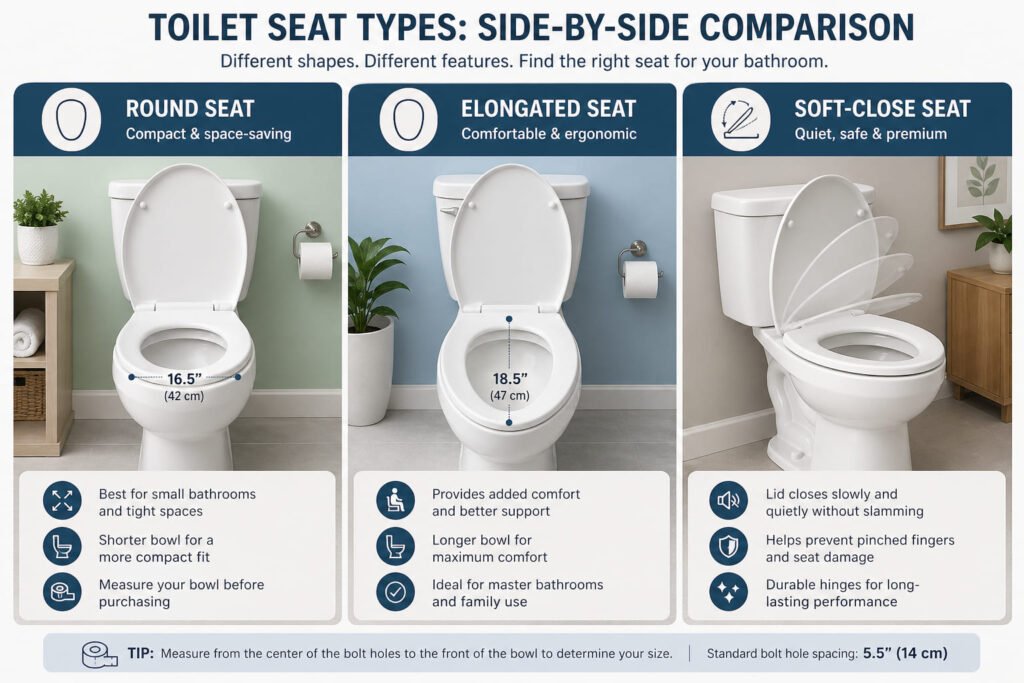
Standard vs. Elongated Toilet Seats
The first thing to check is the shape of your toilet bowl.
- Standard (round) seats are shorter and commonly found in smaller bathrooms.
- Elongated seats are slightly longer and offer more comfort.
Measure your toilet bowl from the mounting holes to the front edge to make sure you buy the correct size.
Soft-Close Toilet Seats
Soft-close seats are designed to close slowly and quietly. They prevent slamming, reduce noise, and last longer. These are a great upgrade if you want a more modern and durable option.
Quick-Release Toilet Seats
Quick-release seats can be easily removed with a button or latch. This makes cleaning much simpler since you can access hard-to-reach areas around the toilet.
Heated and Bidet Toilet Seats
For added comfort, some toilet seats come with built-in heating or bidet functions. These are more advanced options and may require additional setup, but they offer a premium experience.
Why Choosing the Right Type Matters
Selecting the right toilet seat ensures:
- Easier installation
- Proper alignment with mounting holes
- Better comfort and durability
When you start your how-to-install-a-toilet-seat step-by-step guide, having the correct seat type will save time and prevent common installation issues.
Step-by-Step Guide to Installing a Toilet Seat
If you’re wondering how to install a toilet seat a step by step guide – you’re in the right place. Follow these simple instructions to get the job done quickly and correctly—even if you’ve never done it before.
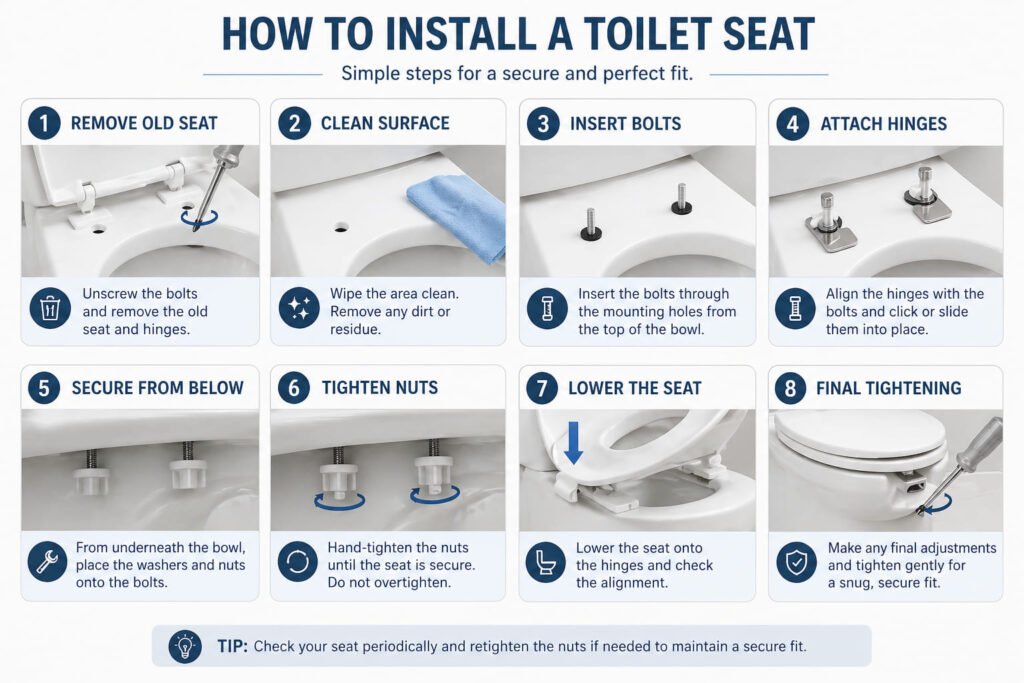
Step 1 – Remove the Old Toilet Seat
Start by locating the bolts that hold the existing seat in place. These are usually found at the back of the toilet bowl.
- Flip open the plastic covers (if present)
- Use a screwdriver on top and pliers underneath to loosen the nuts.
- Once loosened, lift the old seat off.
If the bolts are rusty or stuck, apply a little force or use penetrating oil to loosen them.
Step 2 – Clean the Toilet Surface
Before installing the new seat, take a moment to clean the area.
- Wipe around the bolt holes with a disinfectant
- Remove any dirt, grime, or residue
This ensures a hygienic and smooth surface for proper installation.
Step 3 – Align the New Toilet Seat
Place the new toilet seat on the bowl, aligning it with the mounting holes.
- Make sure the seat is centred
- Adjust it so it sits evenly on both sides.
Proper alignment at this stage prevents wobbling later.
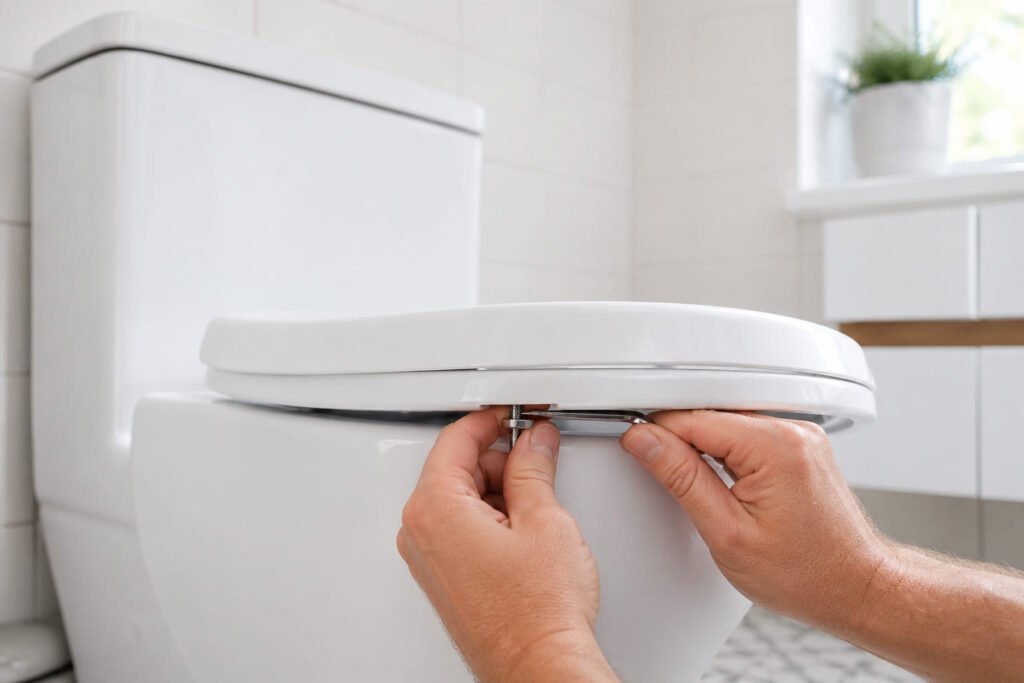
Step 4 – Insert and Secure the Bolts
Insert the bolts that came with your new toilet seat into the holes.
- Push them through from the top
- Attach the nuts underneath the bowl.
- Tighten them gently using a screwdriver or by hand (depending on the design).
Most modern seats come with easy-to-tighten fittings, making this step simple.
Step 5 – Adjust and Tighten Properly
Once the seat is in place, check its position again.
- Adjust if needed to ensure it’s straight
- Tighten both sides evenly
Avoid over-tightening, as this can crack the seat or damage the toilet.
Step 6 – Test the Seat
Finally, test the installation.
- Sit on the seat gently.
- Check for any movement or looseness
If it feels unstable, tighten the bolts a little more until it’s secure.
By following this steps, you can complete the process in just a few minutes with minimal effort.
Common Mistakes to Avoid
Even though this how to install a toilet seat step by step guide is simple to follow, a few common mistakes can lead to a loose, uneven, or uncomfortable seat. Avoid these issues to ensure a smooth and long-lasting installation.

1. Over-Tightening the Bolts
It’s tempting to tighten the bolts as much as possible, but this can crack the toilet seat or damage the porcelain. Tighten just enough to keep the seat stable without forcing it.
2. Misaligning the Seat
Improper alignment is one of the most frequent problems. If the seat isn’t centred, it can feel uncomfortable and may loosen over time. Always adjust the position before fully tightening the bolts.
3. Choosing the Wrong Seat Size
Not all toilet seats are the same. Using the wrong size—round vs. elongated—will result in a poor fit. Measure your toilet bowl before buying a new seat to ensure compatibility.
4. Skipping the Cleaning Step
Installing a new seat on a dirty surface can trap bacteria and grime underneath. Always clean the area around the mounting holes before placing the new seat.
5. Ignoring Loose Hardware After Installation
Even if everything feels secure at first, bolts can loosen after a few uses. Check and retighten them after a few days to maintain stability.
6. Using the Wrong Tools
Trying to install a toilet seat without the proper tools can make the process harder and less secure. Basic tools like a screwdriver or adjustable wrench help ensure a proper fit.
By avoiding these mistakes, you’ll get the best results from this guide and enjoy a secure, properly fitted toilet seat for years to come.
How to Remove a Toilet Seat (Bonus Tip)
If you’re following this how to install a toilet seat step by step guide, the first thing you may need to do is remove the old seat. Don’t worry—this part is quick and straightforward, even for beginners.
Step 1: Locate the Mounting Bolts
Look at the back of the toilet seat where it connects to the bowl. You’ll see two bolts—usually covered with plastic caps. Gently pop these caps open using your fingers or a flathead screwdriver.
Step 2: Loosen the Nuts Underneath
Reach underneath the toilet bowl to find the nuts holding the bolts in place. Turn them anticlockwise to loosen. You may be able to do this by hand, but if they’re tight, use pliers or an adjustable wrench for better grip.
Step 3: Remove the bolts.
Once the nuts are fully loosened, pull the bolts out from the top. If they’re stuck due to rust or buildup, apply a bit of pressure while twisting or use a lubricant if needed.
Step 4: Lift Off the Old Seat
With the bolts removed, simply lift the toilet seat away from the bowl. It should come off easily without resistance.
Step 5: Clean the Area
Before installing a new seat, wipe down the surface around the mounting holes. This ensures a clean, secure fit when you continue with the next steps in this how to install a toilet seat step by step guide.
Removing a toilet seat only takes a few minutes and makes the installation process much smoother. Once done, you’re ready to move on to fitting your new seat properly.
Tips for a Perfect Installation
Even if you follow a how to install a toilet seat step by step guide, a few extra tips can make the difference between a secure, long-lasting fit and a loose, frustrating seat. Here’s how to get it right the first time:
1. Measure Before You Buy
Toilet seats don’t all come in a single standard size. Toilets are typically round or elongated, so measure your bowl before purchasing. Choosing the wrong size can lead to poor alignment and instability.
2. Clean the Area Thoroughly
Before installing the new seat, take a minute to clean around the mounting holes. Dirt and residue can prevent the seat from sitting flush, which may cause wobbling later.
3. Align the Seat Properly
Position the seat so it sits evenly on the bowl. Misalignment is one of the most common issues people face—even when following a how-to-install-a-toilet-seat step-by-step guide. Take your time to adjust it before tightening.
4. Tighten Bolts Evenly
Avoid tightening one side completely before the other. Instead, alternate between both sides to keep the seat balanced. This ensures even pressure and a more secure fit.
5. Don’t Overtighten
It might seem like tighter is better, but overtightening can crack the toilet seat or damage the bolts. Tighten just enough to keep the seat firmly in place without forcing it.
6. Check Stability After Installation
Once installed, gently sit on the seat and shift your weight slightly. If it moves, tighten the bolts a little more. A properly installed seat should feel solid and stable.
7. Recheck After a Few Days
After a few uses, bolts may loosen slightly. Give them a quick check and tighten if needed to maintain a secure fit over time.
By applying these simple tips alongside your how to install a toilet seat step by-step guide, you’ll ensure a smooth installation and a toilet seat that stays firmly in place for the long run.
FAQs
How long does it take to install a toilet seat?
In most cases, installing a toilet seat takes about 10 to 20 minutes. If you’re following a clear how to install a toilet seat step by step guide, the process becomes even faster. The only delays usually happen when old bolts are rusty or hard to remove.
Do I need professional help to install a toilet seat?
No, you don’t need a professional. This is a simple DIY task that almost anyone can handle. With the right tools and a proper guide, you can complete the installation on your own without any plumbing experience.
Can I install a toilet seat without tools?
Some modern toilet seats come with tool-free installation systems, allowing you to tighten bolts by hand. However, for most standard seats, basic tools like a screwdriver or wrench are recommended. Using a proper how to install a toilet seat step by step guide will help you know exactly what’s needed.
How do I know if I have the right size toilet seat?
To get the correct size, measure the length and width of your toilet bowl. Toilets typically come in two main shapes: round and elongated. Choosing the right size is important for a secure fit, and any good how to install a toilet seat step by step guide will emphasise measuring before installation.
Can I replace a toilet seat with any brand?
Yes, most toilet seats are designed to fit standard toilet sizes, so different brands are usually compatible. Just make sure the shape (round or elongated) matches your toilet. A proper how to install a toilet seat step by step guide will always recommend checking compatibility first.
What should I do if the bolts are stuck or rusted?
If the bolts are stuck, try using pliers or apply a lubricant to loosen them. In some cases, you may need to carefully cut the bolts. This is a common issue, and any detailed step-by-step guide on how to install a toilet seat will include tips for handling stubborn hardware safely.
Conclusion
Installing a toilet seat is a simple task that doesn’t require professional skills or advanced tools. With the right approach and a clear how to install a toilet seat step by step guide, you can complete the entire process in just a few minutes.
By carefully removing the old seat, aligning the new one properly, and tightening the bolts evenly, you ensure a secure and stable fit. Taking your time with each step also helps avoid common issues like wobbling or misalignment.
Overall, this is one of the easiest home maintenance tasks you can do yourself. Whether you’re replacing a damaged seat or upgrading to a more comfortable design, following a how to install a toilet seat step by step guide makes the job quick, clean, and stress-free.